the website design process: from sitemap to launch
Getting a new website for your company that you can be oh-so-proud of, that will give you the results you’re looking for, is an intentional process that takes time.
We get it. Once you’ve decided you need a website and got excited about sharing it with the world, a big part of you would just like to be able to click a button and launch it, fully formed, without doing all the legwork that gets you from the idea to the unveiling.
But trust us when we say that every single step involved in building your site is vital, and it’s only by taking all those steps, rather than trying to skip ahead, that you’ll end up with the best results.
If you’re at the start of this journey, then understanding the path ahead of you will help you get the very most out of working with us, your website design agency. For helpful tips on pre-planning your website needs, read our blog post “How to Plan for a New Website.”
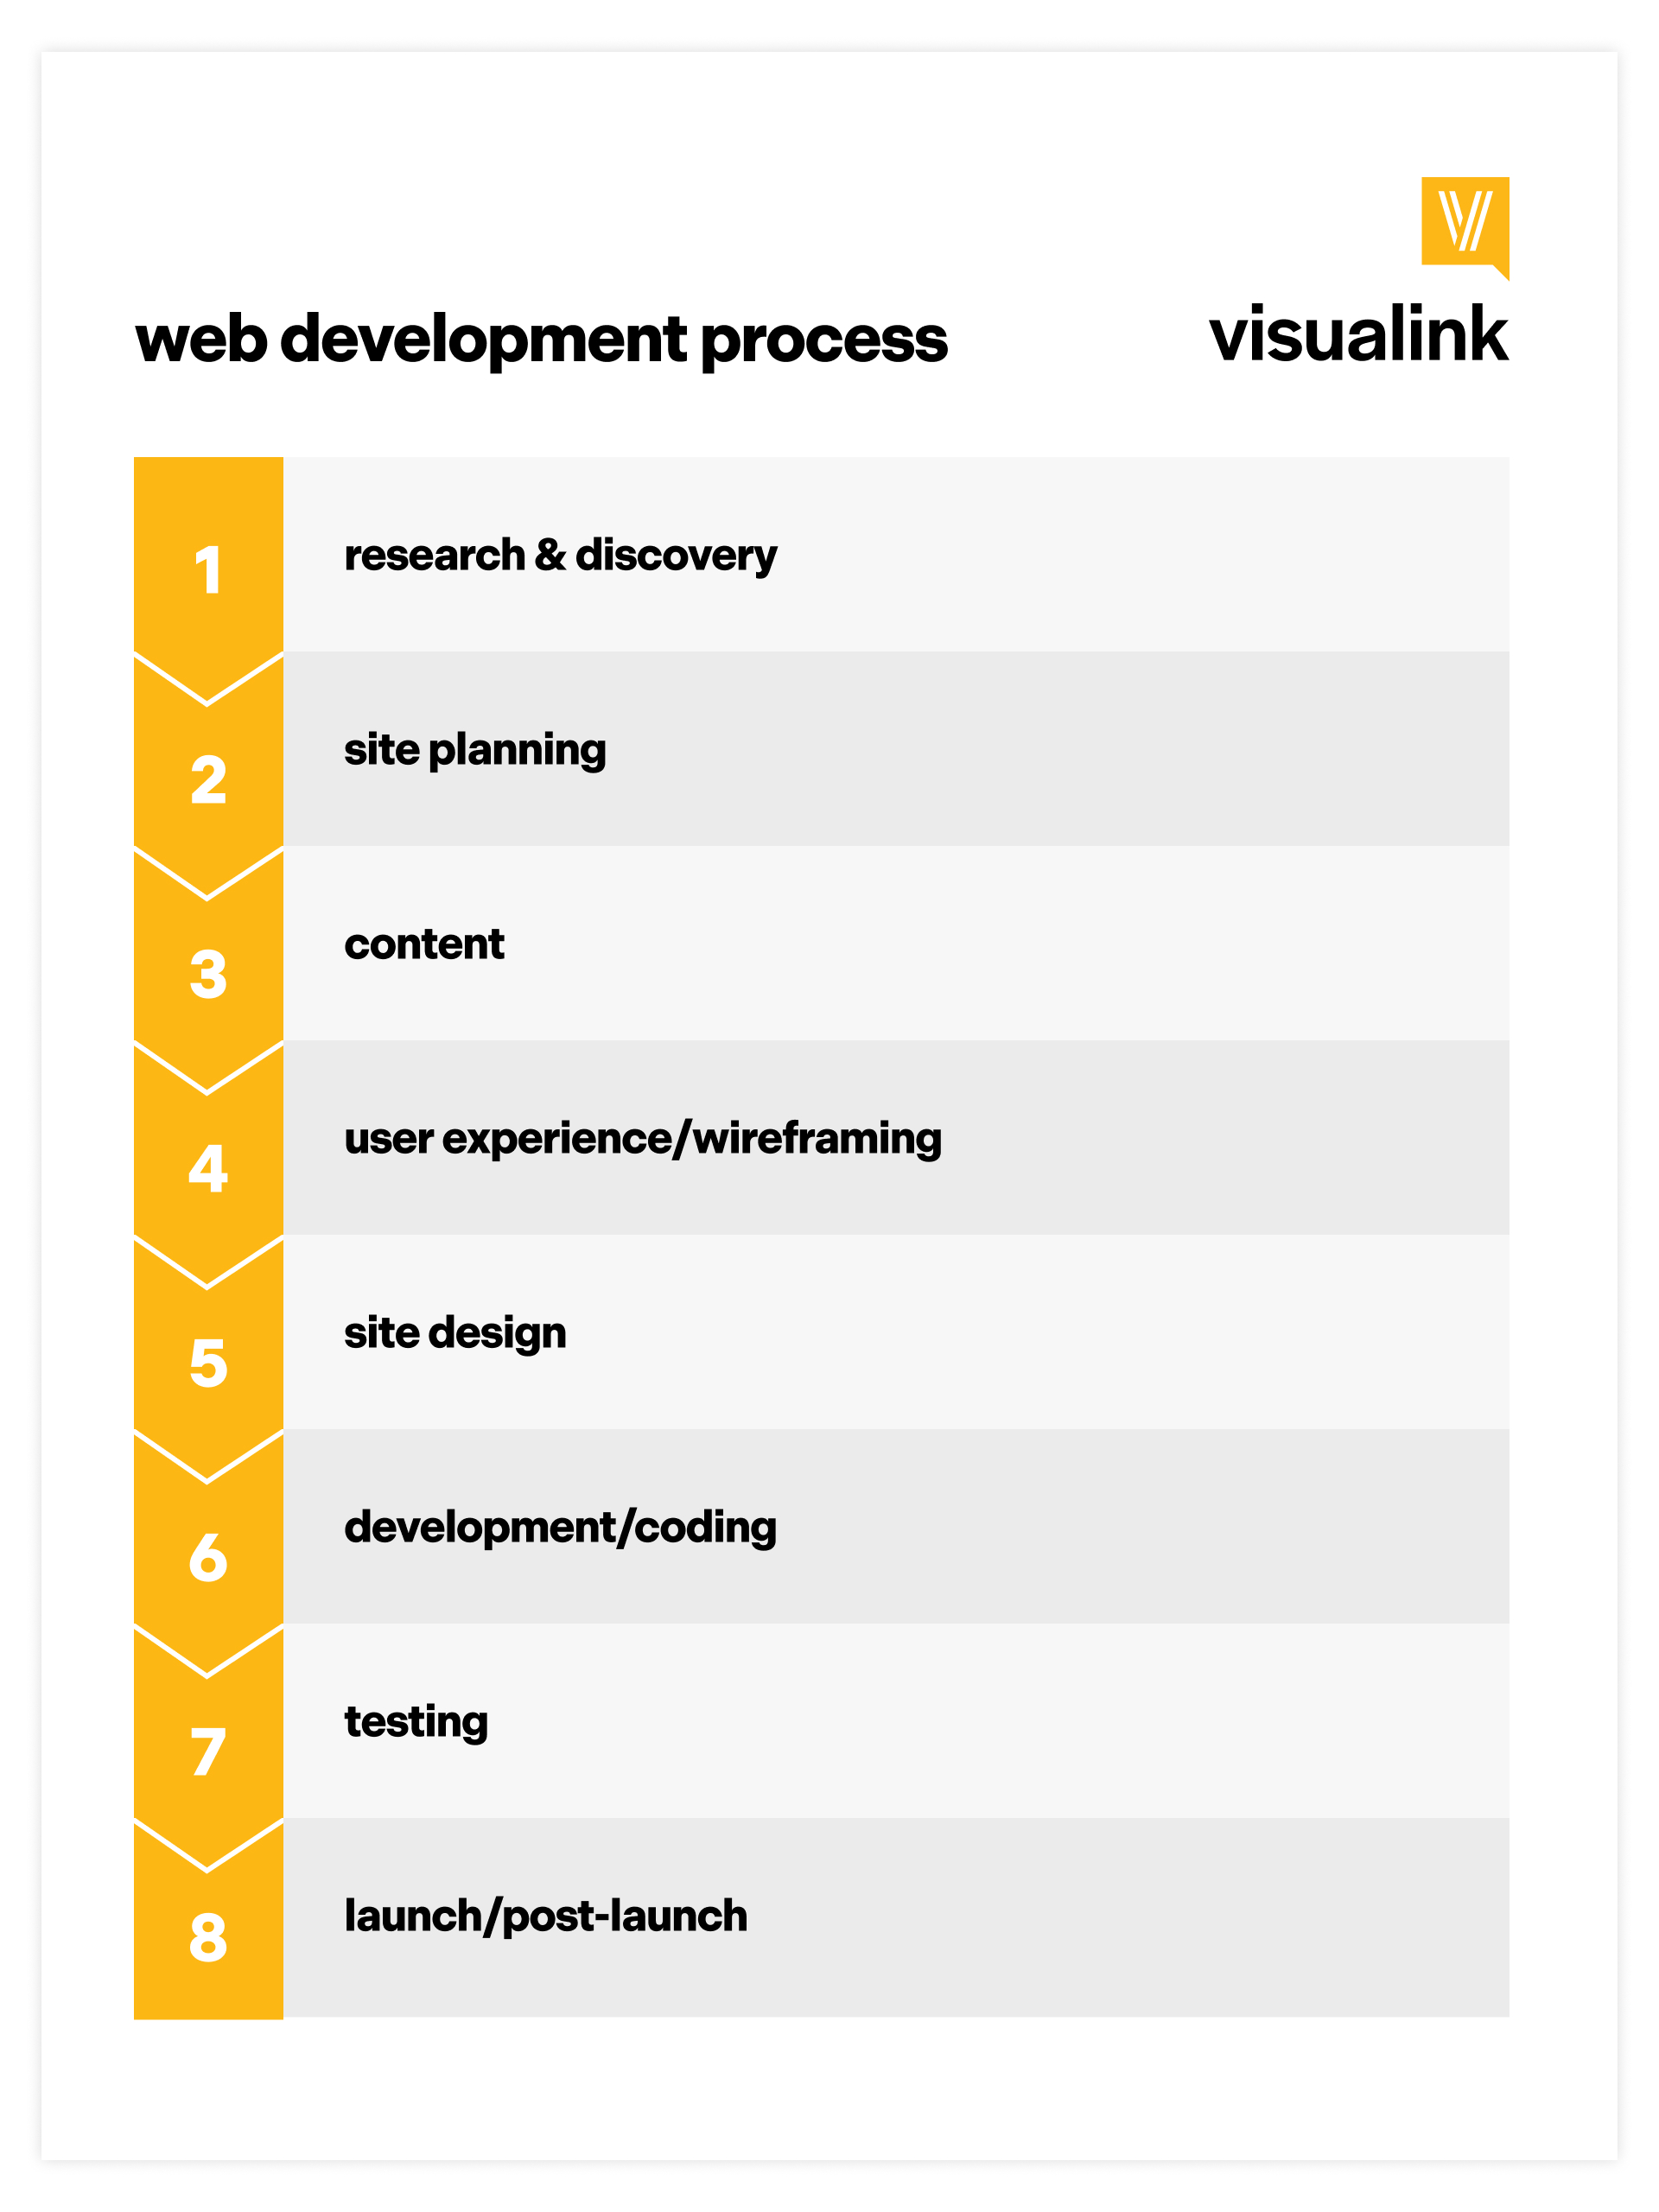
In this article, we’ll take an in-depth, behind-the-scenes look at the process, going over every single stepping stone involved:
- Research and discovery
- Site planning
- Content
- User experience and wireframing
- Site design
- Development and coding
- Testing
- Launch and post-launch
By the end of it, the whole process will feel far less complex and daunting, and you’ll understand just how much we’re going to achieve between now and when you cross the finish line on launch day.
why a structured process matters
Websites need to look great to those who visit them, but visual appeal isn’t enough to get customers beating a path to your door.
A strong website is built on a foundation of thoughtful planning, with every aspect logically, intentionally designed with user behavior in mind.
But that’s not the only reason why, at Visualink, we know that having a solid, tried and tested website design framework leads to the best results for you, our clients:
it prevents mistakes and revisions, which come at a cost
Having regular checkpoints throughout the process brings down the risk of major structural elements having to be reworked.
That’s good news for your budget, as changing the structure of your site after development is far more expensive than making tweaks during the early planning stages.
it means you know where you stand, with realistic expectations and clear timelines
Clarity is the name of the game, so we’ve made sure our process visual makes it easy for you to track where your project stands and what’s up next.
This way, you’ll know exactly what you need to bring to the table and when, and when you can sit back and relax, and let us do the hard work.
how long can you expect your project to take in total?
Realistically, a custom, robust website can take anywhere from three to six months to complete, but it might be longer, depending on whether the necessary content is available on schedule. We’ll always make sure you know exactly where your project stands.
step 1: research and discovery
Creating a great website starts with us getting to know your business’s goals, audience and competitors inside out.
- Goals: What does success look like for your website? What’s the best thing that could possibly happen when someone lands on your website? (more inquiries, increased orders, improved user engagement, educating customers, newsletter sign up, quote request, etc)
- Audience: Who will visit the site, and what questions are they trying to answer by doing so?
- Competitors: What are competitors doing well? Where are they falling short? How can your site do it better?
Based on all that, we can define the scope of your project, and create a project brief for your approval.
To keep your project moving forward on schedule, at this stage we’ll also let you know everything we’ll need from you throughout the website project, and work with you to create a list of all the content you’ll need to gather, including branding, copy, images, videos, documents and more.
step 2: site planning
Step two is all about planning out the bones of the site. Things can get a little technical at this time, so bear with us.
determine your domain name and hosting service
At this stage, it’s good to consider what your web address will be (and make sure it’s available), so your customers will know how to find you. You’ll also need a web hosting server.
You might have one or both of these sorted already, which is great, but if not, we’re here to help. We host the majority of our clients’ sites through a third party, and we strongly recommend opting for this so we can provide support more easily.
user flow and site mapping
Just as you wouldn’t build a home without architectural drawings, before website construction begins, we need to create a blueprint for how users will move through it and what actions they’re meant to take.
The main guide for creating this blueprint for your site’s structure will be the thing that your users are primarily looking for, as established in step one.
We make sure they can access it with just a few clicks. For example, a restaurant’s website may prioritize menus and reservations, while a retail website will focus on the product and checkout.
Web usability expert Steve Krug, known for advising companies like Apple and Bloomberg, defines his core rule of good design as:
“Don’t make me think.”
If your visitors are having to scratch their heads or search through unclear menus or search bars, you’ve already lost them.
If the value they can get from the site isn’t clear in just a matter of seconds from the first page they land on, they’ll most likely leave and find what they’re looking for elsewhere. This is known as having a high bounce rate.
Not to worry, though. A good web designer knows how to make getting to that all-important point obvious, easy and intuitive.
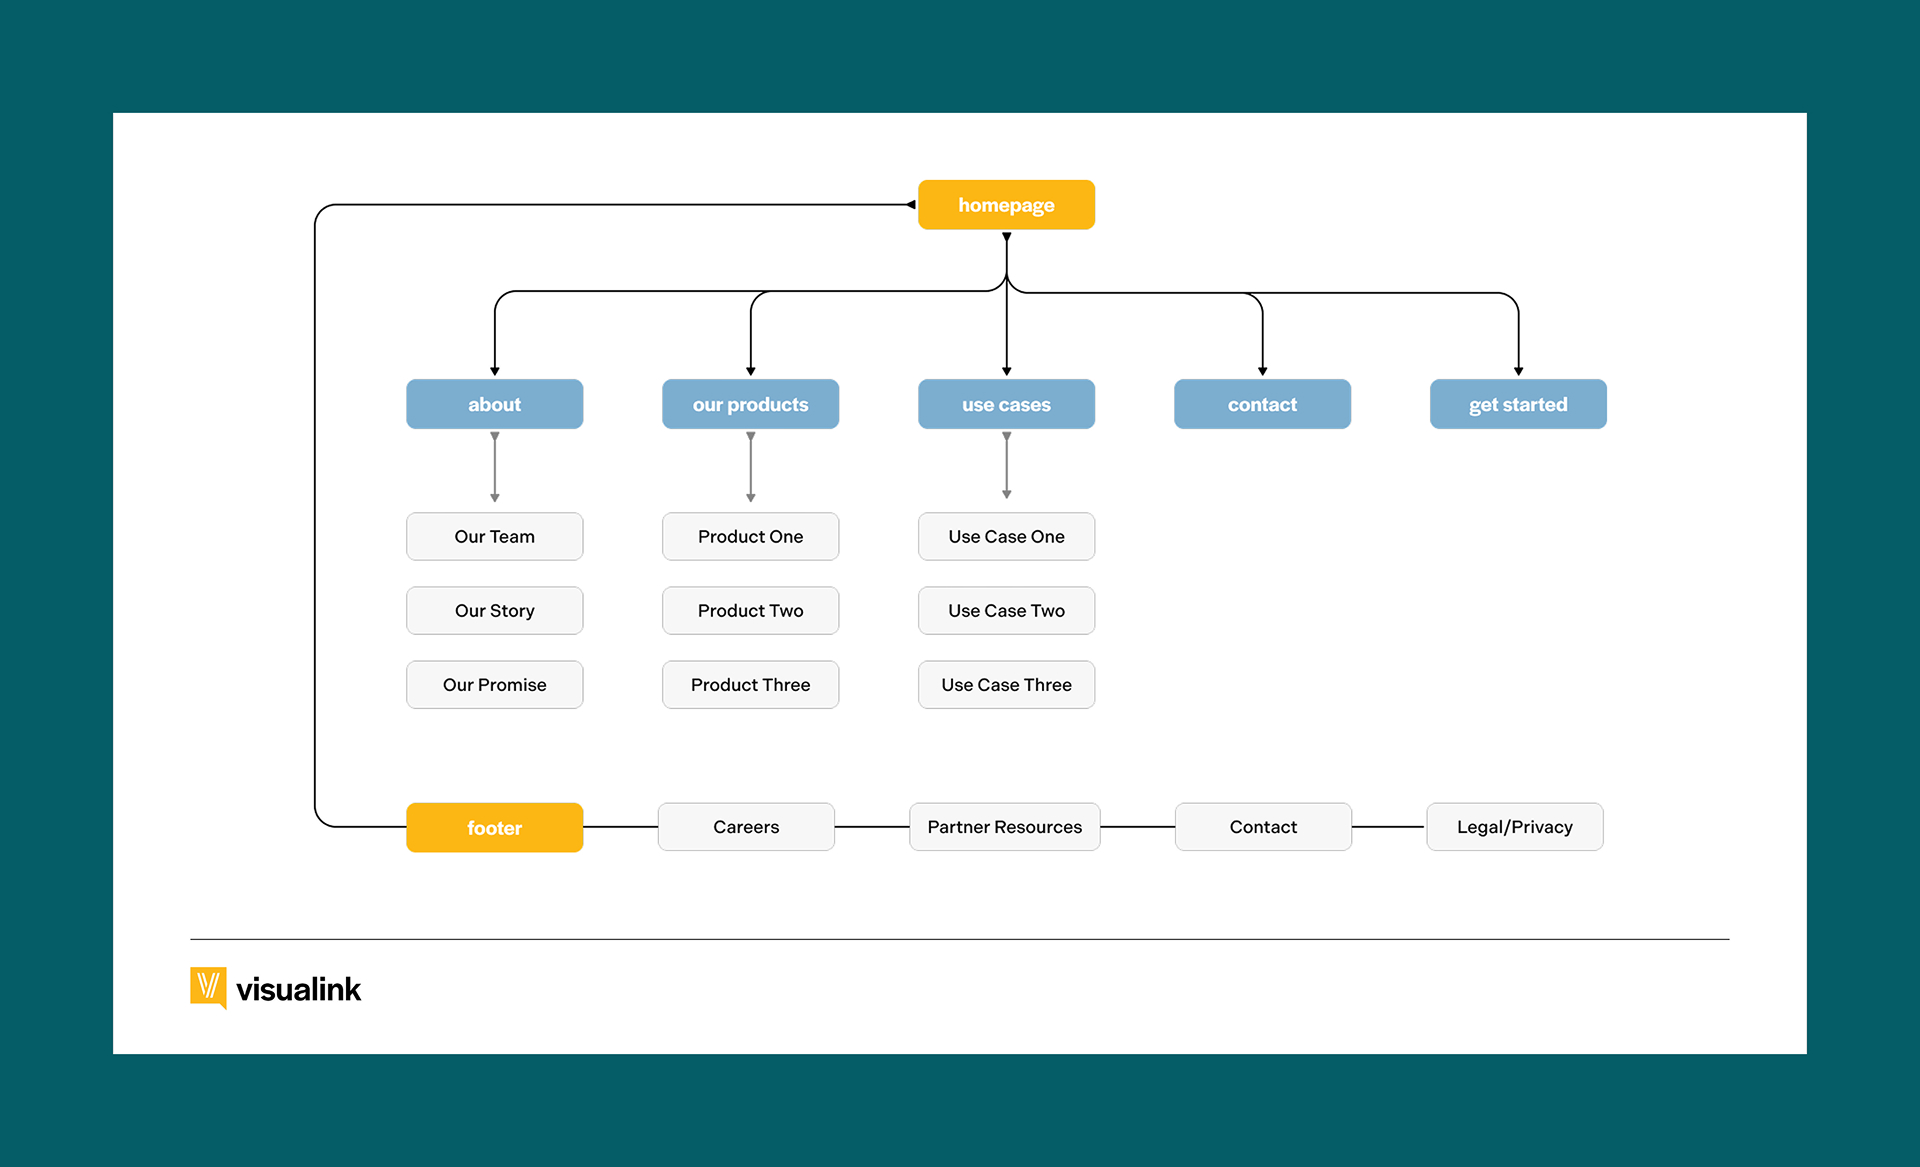
what’s a sitemap, and why is it essential?
Taking all of the above into account, we map out the structure of your whole site.
A sitemap is a visual map of the website that shows the relationship between pages, the page hierarchy, and a brief overview of the content on each page.
This helps determine the number of pages needed and creates a great starting point for a content outline.
Once your sitemap is ready to go, it’s time for you to approve it, at which point we’ll send over your final scope of work estimate.
Groundwork carefully laid, this is where things really get exciting, as it’s time to start creating.
step 3: content
As a Visualink website design client, there are points in the website design process when you can let us take care of everything, and points when we need your active involvement in shaping your website.
No matter how well-designed your website is, if the content falls short, so will your website. The verbal and visual content is the heart of your website, and is something we’ll need plenty of input from you on, because it has to accurately reflect your brand and goals
Throughout this part of the process, it’s so important to put yourself in your customers’ shoes and create your content around what will attract, retain, and add value to their visit.
Compiling the content we need to move forward can be time-consuming, especially if you’ve got a lot of pages on your site. But the sooner you’re able to provide it, the sooner your website project will be able to progress, which is why it’s a great idea to start thinking about all the content you’ll need back during step one.
Here are some of the main things to remember while you’re bringing the content for your site together:
verbal content
As part of your website project, you might have chosen additional copywriting support, or you might have chosen to handle this side of things yourself.
Either way, the words crafted for your site should channel your established brand voice, clearly inform users about your company and services, and signpost them toward the action you’re aiming for them to take, with clear call-to-actions (CTAs), such as “Buy now” or “Get a quote”.
Good copy should mainly be written with your customers in mind, but taking SEO best practices into account can help drive the right visitors to your site.
visual content
Blurry, low-resolution images can make even the most beautiful design feel unpolished, so providing us with high-resolution, sharp photos from a professional makes a massive difference.
Once you’ve sent us your photos and videos, we’ll take care of optimizing them for the web, meaning they’re resized and compressed, so they load quickly without losing quality.
This is a behind-the-scenes step most people never notice, but it makes a major difference in overall performance and search engine optimization (SEO).
step 4: user experience and wireframing
“Some people think design means how it looks. But of course, if you dig deeper, it’s really how it works.”
-Steve Jobs
Making your website look great is, of course, second nature to us. But that comes after the most important things: structure and functionality.
We start planning your site by focusing on how each page is going to work, rather than how it’s going to look. And we do that through creating wireframes.

The wireframes you receive from us for your approval will look something like this. They’re simple, black-and-white, easy-to-edit layouts that outline the basic structure of each page.
The focus at this point is user experience (UX) design, which is about making sure each page is easy and accessible for your audience to use.
It’s about the placement of elements like headlines, images, buttons and forms, rather than colors, fonts, photos and branding, all of which will come later.
It’s about thinking through how layouts and functionality will adapt across devices (desktop, tablet, and mobile, which might make up the majority of your traffic).
It’s about getting any usability, navigation and content flow challenges sorted at this early stage, before things are locked in.
Keeping it practical and user-experience focused means that our conversations can center around whether each page meets the business’s and users’ needs, rather than getting caught up with color or style preferences too early on.
why this phase saves you time and money
Every phase of the website design process is crucial, but stage four is particularly significant, as catching issues in wireframe design prevents major changes from having to be made later when your website design and development are already underway. Adjusting a wireframe takes minutes, whereas adjusting coded pages can take hours.
This is a major checkpoint for your project, so while we always attempt to keep the momentum going, take your time to carefully review all the wireframes and information we send you. Anything that’s missing here will be missing in the final version.
Next up, we’ll be progressing to stage five, where visual design begins.
step 5: site design

Based on top website statistics gathered by the Forbes Advisor Team in 2024, a visitor decides what they think of a website in roughly 0.05 seconds.
That means we, as web designers, have less than a blink of an eye to make a good first impression.
With user experience wireframes approved, it’s time to move on to UI (user interface) design mockups. This is where the visuals come into play: colors, typography, spacing, buttons, icons, and graphic elements.
This stage is when you’ll get your first peek at what your new website will actually look like, starting with your homepage. We’ll get creative with imagery, brand elements, textures and colors to create a cohesive experience that feels like an extension of your company.
This page will set the visual direction for your entire site, so you’ll have the chance to give it your seal of approval or send us any feedback before it’s used as the foundation for the remaining pages.
step 6: development and coding
Designs signed off, it’s time for our developers to start turning mockups into an interactive, working website.
This involves recreating every component using web languages like HTML, CSS, and JavaScript so the site behaves exactly as the web designer intended.
the basics of HTML, CSS, and JavaScript basics (high-level)
This might sound confusing, but it’s actually simpler than you’d think.
Think of it like this:
If a website were a person, HTML (Hypertext Markup Language) would be the skeleton, giving it structure; CSS (Cascading Style Sheets) would be the clothes and appearance, making it look polished; and JavaScript would be the brain and muscles, allowing it to move and interact.
All three layers work together to bring the design to life, and it takes an experienced developer who has mastered the code for each of these languages to make it happen.
responsive design implementation
Responsive design begins in the wireframe and design phases and gets implemented here, in the development phase.
Our developers code the site so it functions beautifully across devices and screen sizes. Elements automatically adjust, such as stacking sections for mobile screens.
content management system (CMS) setup
After the coding is complete, our developers set up the CMS platform (i.e, WordPress), which will allow you to update the content on your finished site without touching the code.
This step defines what you can manage independently after launch, so the way it’s set up will be tailored to you, based on how much access you’d like to have. For example, we can configure editing tools that will allow you to easily add pages, swap photos, edit text, or post blogs without our help.
step 7: testing
The end of the project is very much in sight at this point, and you’ll be getting excited to share your website with the online world.
But before it’s ready to go, the testing phase kicks in.
We’ll carefully test your site across devices and browsers, making sure every button, form, menu, and interactive feature works seamlessly. Nothing frustrates a user faster than a broken link or a button that doesn’t respond, so we catch any hiccups before anyone else does.
Beyond that, we’ll implement:
- Spell check: Reviewing the final content and copy for spelling and accuracy before going live.
- Accessibility checks: We double-check text readability, color contrast, and screen-reader compatibility to make sure no visitor is left behind. A website should be welcoming to everyone.
- Security checks: Protecting your site and your visitors’ data is critical. Checking the site’s security involves using secure forms and guarding against common vulnerabilities.
step 8: launch and post-launch
The big moment’s finally here. All the work you’ve put into this site has led to right here and now.
At Visualink, we check all our lists twice at all times of year, so it’s time for one final review to make doubly sure that everything from functionality to analytics is ready to have public eyes on it.
going live: DNS and hosting setup
The last step to launch your site is to point your domain to the new site, configure your hosting, and make sure the transition is smooth and the website goes live at the time that works best for you.
monitoring for issues post-launch
Wait, there’s just a little bit more! Once the site is launched, we do another round of testing, which involves looking out for any unexpected errors and getting them resolved quickly.
And now you really are done, so it’s time to give yourself a huge pat on the back. Massive congratulations on making it this far!
Launching a new website is a massive accomplishment and sets the stage for years of return on your investment.
And while going live may feel like the finish line, it’s really just the beginning. Ongoing maintenance keeps your content fresh, ensures your site performs at its best in terms of speed, security, and mobile-friendliness, and helps maintain strong search engine rankings, so your website continues working hard for your business long after launch.
the website development process: slow and steady wins the race
The process of getting a new website designed should be a well-planned, well-prepared marathon, not a sprint.
It takes you from research through site planning to content, past wireframing and site design to development, and finally, on the home stretch, through testing to launch, and the all-important post-launch.
Having a solid race plan in the form of a logical, fixed process leads to the best results. If you know the route map before you get off the starting blocks, you can get so much more out of your website build, and plan for the experience so much more effectively.
If you’re interested in how Visualink can support you with website services tailored to fit your unique needs, head over to our services page.
And if you’re considering a new website and would like to learn more, just reach out to us by filling out this simple form.